INSTALL LAMP ROD
- Load lamp rod subassembly onto wrench.
- Insert into one bottle.
- Put other wrench on handy rocket stand, using PVC coupler.
- Put other nut on wrench and stack nylon washer on top.
- Slide bottle onto wrench above.
- Align washer and nut onto lamp rod.
- Thread onto lamp rod.
- Twist wrenches in opposite directions and tighten nuts.
- Done!
Install the locknut/nylon washer/ lamprod subassembly as mentioned above into one of the long wrenches.
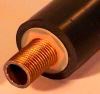
Insert long wrench and subassembly into bottle. When lamp rod meets with the hole, you will need to rotate the wrench clockwise, spinning the threaded lamp rod into the hole. Stop turning when the washer & locknut meet with bottom of bottle.
If you encountered a slight problem of thread locking adhesive not holding, don't worry, I have a solution at this point. Unscrew the locknut back to it's original position, (near the end of lamp rod). Ok, remove the long wrench, and replace it with the 3/8" drill bit & extension, used before for drilling the hole. Center the drill bit on the lamp rod, and SLOWLY spin the drill bit. The drill bit will bite into the lamp rod and spin it into position for you…..(cool solution)
If you have a "handy stand" as mentioned above, now is the time to place it on your table. Insert the other long wrench into the slip connector (of the handy stand) with the socketed end on top. Embed the locknut in the socket, and then place a washer, on center, on top of the locknut.
Now, carefully slide the opposite bottle over this wrench. Align the exposed lamp rod through the washer and onto the locknut and screw the bottle clockwise. Once the threads are ingaged, you are almost home free.
Grab opposite wrenches and twist in opposite dirrections to tighen the whole assembly.