Bottle Preparation
- Remove labels.
- Draws felt tip lines for placement of fins.
- Sand paper plastic for glue.
- Put one bottle on a Rocket stand.

The process in this example starts with 2 each 2 liter bottles, however most any size soda bottle will work with threaded lamp rods. First remove soda brand labels.

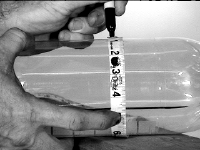
To draw perfectly straight locating lines for the fins, I use a 2"x4" wood piece, a felt tip marker, and a bottle.

Measure three spots located 4.5 inches apart around the circumference.

Using sandpaper, rough up the surface of the bottom of the bottle. Be sure to sand between the "feet" on the bottom.

Wrap the circumference of the bottles with filament pachage tape. In this example I wrapped the bottles three times each. I like to wrap the girth of the bottle 1.5 times, just to have enough overlap to secure the tape on the bottle. Remember, these bottles expand 5/16 inches in circumference when pressurized. This filament tape prevent the walls of the bottle from rupture. The bottle that was marked with three lines will be the "inverted bottle". The other bottle will be the upright bottle for the nose of the rocket. It is mostly filled with water for weight for the gluing process.

A home made rocket stand is helpful for assembling rockets. Make sure you make the handystand with only slip joint connectors. This will allow you to use the homemade PVC socket wrenches mentioned below. Many days, I use three of these stands for holding three rockets while glue is curing.
The bottle on the stand has no water. The “top bottle” is filled with water and capped.
